Issue Resolution and Clash Avoidance with Autodesk BIM Collaborate

Construction management is a highly complex and multi-dimensional collaborative effort. To execute on projects effectively, several people and moving parts all need to click and stay in sync. Issues need to be resolved quickly, questions must be answered in a timely manner, and there should be trust and accountability across the entire team.
Accomplishing all that, however, is easier said than done.
Design and construction teams struggle to find a seamless way to identify issues and circulate them to the appropriate stakeholders. Often, teams rely on spreadsheets, static reports, or third-party management solutions to gather information and make decisions.
Unfortunately, these tools and sources are unreliable and inaccessible to the wider team. They cause confusion and are ultimately ineffective for detecting clashes and resolving issues. Not to mention, the manual tasks involved with static documents and spreadsheets are tedious, time consuming, and can cause issues to slip through the cracks.
The result? Issues that could’ve been avoided bubble up to the surface later on in the form of rework — and unnecessary costs. Clashes alone account for 5% of construction spend and 52% of the $280 billion of annual rework costs are caused by poor project data and communication globally.
To address this, many companies turn to third-party point solutions to address specific problems. However, these programs usually require further training and implementation, as well as additional costs.
To make matters more complicated, the different parties involved (e.g., design firms, GCs, and subcontractors) all use different systems and platforms. The JBKnowledge 2020 ConTech report found that 63% of construction pros are using three to six more apps — which makes integration and communication harder and limits project data usage.
All this to say that managing project issues in construction can be a headache.
What if you could address issues at the same time and at the same place, to streamline resolution?
The combination of Autodesk BIM Collaborate (part of the Autodesk Construction Cloud platform), Navisworks, and Revit makes all that possible.
Thanks to the tight integration between these solutions, issues can be created, managed, or resolved directly in the tools you work in daily, and are connected using a common data environment (CDE).
By surfacing and resolving issues in a CDE, you create a lasting history of decisions made for downstream stakeholders for future reference. It also allows multidisciplinary teams with different tools to manage and communicate about issues using a common solution.
All in all, this paves the way for a roundtrip workflow, which helps teams close the loop with any clashes or issues that arise.
Issues created in either Autodesk BIM Collaborate or Navisworks can be assigned and contextualized in either of those tools and resolved in Revit. That resolution then makes its way back to Autodesk BIM Collaborate for reporting and future project forecasting.
Let’s take a look at just one of the ways all these solutions work together.
Autodesk BIM Collaborate
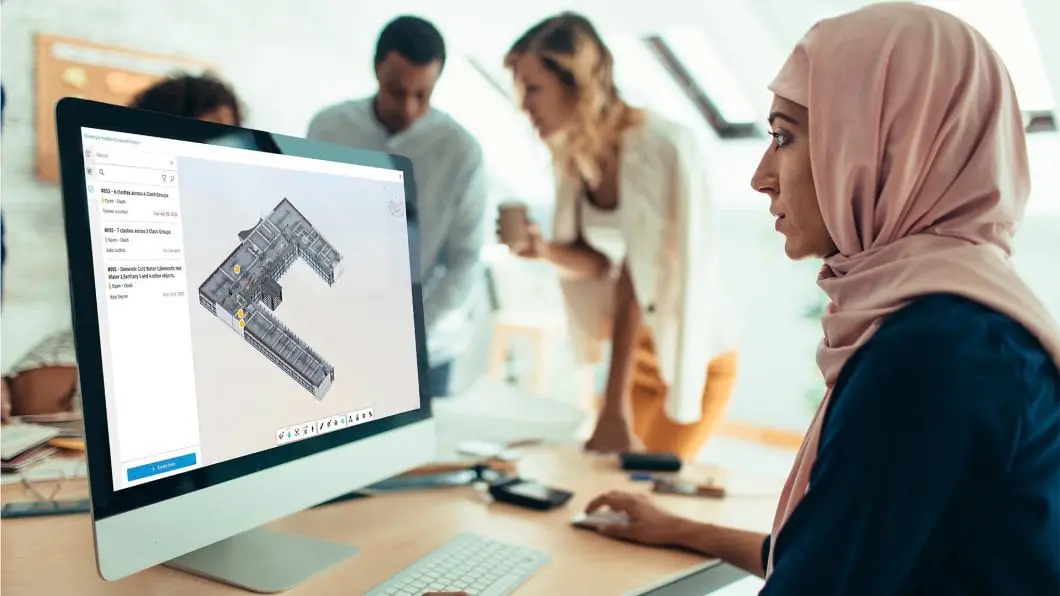
Autodesk BIM Collaborate’s browser-based model coordination and design collaboration tool comes with automatic clash detection and grouping tools that help identify issues early on. The software’s UI is intuitive and easy on the eyes, so all discipline types (designers, GCs, and specialty contractors) can use the solution.
Team members can self-check their work as they go, and if issues come up, they can flag it with a location pin and add details such as the root cause, description, important dates, and clash screenshot. From there, they can assign the issue to the appropriate stakeholder.
Because multiple stakeholders can take part in identifying and assigning issue tasks, the coordination process is faster and much more streamlined. Issues and their associated models are stored in a common data environment for multi-team, product, and construction phase access to action on.
Navisworks Coordination Issues Add-In (Navisworks 2021-2022)
This Navisworks add-in connects models, views, and issues through a CDE, so BIM/VDC managers can easily create, track, assign, and resolve issues directly in their desktop application.
If a Navisworks user is unsure about an issue, they can simply comment directly within the platform. Similar to Autodesk BIM Collaborate, users can add issues and include details like type, location, assignee, description, and due date. They can then pair that issue with an image snapshot of the clash identified. Thanks to this add-in, stakeholders using the software can better contextualize the issue, resolve it, or assign it to someone else.
Navisworks also has an updated Coordination Space and Append capabilities. With the upgraded issues add-in, users now have the ability to append additional models from a Model Coordination space to their already opened set of models. This increases the efficiency of coordination meetings by allowing users to immediately update your .nwf files as new model files arrive from project design teams.
Plus, this free add-in seamlessly connects with Autodesk BIM Collaborate and Revit, so there’s no need for third-party integrations. You’ll reduce manual work and miscommunication, and resolve issues more quickly.
See for yourself by downloading and installing this add-in from the Autodesk App Store. Once installed, start Navisworks and navigate to the Coordination tab.
Revit Issues Add-in (Revit 2020 or later)
Using the very same common data environment and issues layer, architects and engineers working in Revit can scan through all the details we covered above and any additional information from the comments/history, to resolve the issue directly in the model.
This type of connectivity displays the same information to the entire project team, thus enabling stakeholders to literally stay on the same (digital) page. Stakeholders benefit from having more transparency and greater levels of accountability which result in less rework from issues slipping through the cracks.
Instead of waiting until the next coordination meeting to resolve an issue, users can continuously collaborate on models, speeding up time-to-site and reducing the expensive design iterations that occur from poor and sporadic communication.
You access this add-in from the Autodesk Desktop App or your Autodesk account. Get more info on how to use it from the Autodesk Knowledge Network.
Bringing It All Together
Autodesk BIM Collaborate, along with the Navisworks and Revit add-ins, take issue management to a whole new level.
These tightly integrated tools don’t just let you track or manage issues, they create an environment to collaborate and resolve them.
Issue resolution is tracked in Autodesk BIM Collaborate with a dashboard of outstanding issues and resolution overtime, paving the way for better management and prediction for future projects.
Plus, the entire project team can work together to resolve issues and collaborate with a “clash avoidance” mindset (as opposed to a “clash detection” mindset). This speeds up the time-to-site and reduces costly rework.
With a roundtrip workflow, issues are created in either Autodesk Construction Cloud or Navisworks, and actionable in Autodesk BIM Collaborate, Revit, or Navisworks, bringing the best of each environment to your next project.
Interested in experiencing Autodesk BIM Collaborate for yourself? Request a trial today.