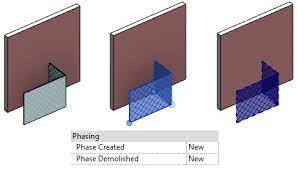
Phasing in Revit is an essential tool for projects that involve renovation or construction in stages. This feature allows you to differentiate between existing, demolished, and new construction elements within a project. In this tutorial, we’ll walk through how to set up and use phasing effectively for a simple renovation project.
Tutorial Objectives:
– Understand the basics of Revit phasing.
– Set up phases in a Revit project.
– Assign elements to different phases (Existing, Demolished, New).
– Adjust phase filters to control the visibility of elements in views.
– Create a phase-specific view (Existing Plan, Demolition Plan, New Construction Plan).
Step 1: Understanding Phases in Revit
Revit uses phases to manage different stages of a project’s lifecycle. By default, Revit includes two phases:
– Existing: Represents the current state before any new work begins.
– New Construction: Represents elements that are added during the project.
You can add more phases if needed (e.g., “Demolition”), but in most renovation projects, these two are sufficient.
Step 2: Setting Up Phases in Your Project
- Open your Revit project.
- Go to the Manage tab on the ribbon and click on Phases.
- In the Phases dialog box, you will see two default phases: Existing and New Construction.
- You can add more phases by clicking Insert if your project requires it (e.g., adding a “Demolition” phase).
Step 3: Assigning Phases to Elements
Every element in Revit can be assigned a specific phase:
- Select an element in your project (e.g., a wall).
- In the Properties palette, find the Phasing section.
- Set the Phase Created property. For existing elements, set it to Existing.
- For new elements, set the Phase Created to New Construction.
- If an element needs to be demolished, set Phase Created to Existing and Phase Demolished to New Construction.
Step 4: Using Phase Filters in Views
Phase filters control the display of elements based on their phase status:
- Select a floor plan view (e.g., “Level 1”).
- In the Properties palette, find the Phase and Phase Filter settings.
– Phase: Set this to the phase you want the view to represent (e.g., “Existing” or “New Construction”).
– Phase Filter: Choose a filter like Show All, Show New, or Show Demo based on what you want to display.
- Try switching between different phase filters to see how the elements change visibility.
Step 5: Creating Phase-Specific Views
To effectively communicate your renovation project, set up separate views for each phase:
- Duplicate your floor plan view (Right-click the view > Duplicate View > Duplicate).
- Rename the views according to the phase (e.g., “Level 1 – Existing,” “Level 1 – Demolition,” “Level 1 – New Construction”).
- Set the Phase and Phase Filter properties for each view:
– For Existing views, set the Phase to “Existing” and the Phase Filter to Show Complete.
– For Demolition views, set the Phase to “New Construction” and the Phase Filter to Show Demo.
– For New Construction views, set the Phase to “New Construction” and the Phase Filter to Show New.
Step 6: Annotating Phase Views
- Add tags, dimensions, and annotations as needed in each view.
- Ensure that demolished elements are properly indicated with a dashed line or other visual style (controlled by the Phase Filter settings).
Step 7: Creating a Phase Schedule (Optional)
You can also create schedules that list elements based on their phase:
- Go to the View tab and click on Schedules > Schedule/Quantities.
- Choose a category (e.g., Walls) and click OK.
- In the Schedule Properties dialog, add the field Phase Created.
- Use filters to separate existing, demolished, and new elements.
Tips:
– Use graphics overrides in the Phases dialog to customize how different phases appear (e.g., existing elements in gray, demolished in dashed lines).
– Check the Phase Filter settings carefully, as they control what elements are visible in each view.


